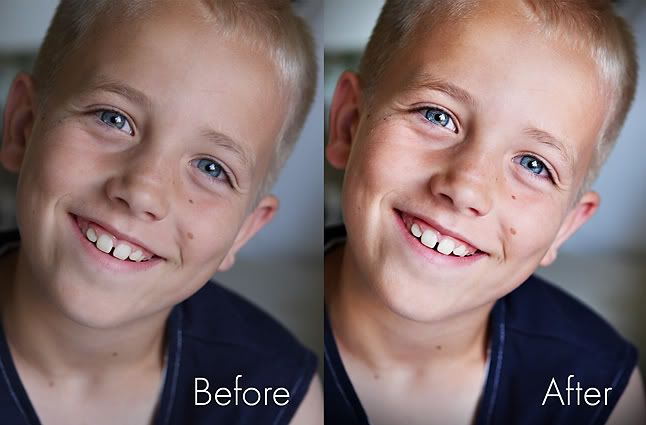
I've had some people ask me to give them some photoshop tips, which is so funny to me because I am so new to photography and photoshop. But anyways, I thought I'd post a sooc (straight out of camera) shot before and after I've edited. FYI, I'm no photoshop pro AT ALL! But, I have spent countless hours lately, playing around in photoshop to improve my pictures. This isn't the best picture in the world, but I love that I got a real smile outta that boy (and I haven't posted very many of Mase lately and feel kinda bad about that. He's tough one to photograph these days.
I use Photoshop elements 5.0 right now, however I think I may be upgrading soon. Yay! Okay, so if you've never used photoshop before, this will all probably sound like a foreign language to you, but here I go.......I 1st duplicated the layer and changed it to screen layer. I lowered the opacity to around 80%. I then flattened the layers and duplicated again. This time, I ran it as a hardlight layer at 20% and flattened again. After that, I bumped up the saturation 6%. I then sharpened just the eyes, and ran Ren's defog action at 75%. To top it off, I burned the edges to give it a more finished look. It's a lot of steps, I know. Editing takes a lot of time. And, every picture I edit needs a little something different. But, I believe that every picture can use some tweaking to look even better. I hope that helps anyone who was wondering what I do.


 src="http://i305.photobucket.com/albums/nn231/LauraFarris/Ellablogheader.jpg" alt="Slideshow Image 1" class="active" />
  ">
">  src="http://i305.photobucket.com/albums/nn231/LauraFarris/TE-39eBWflashheader-4.jpg" alt="Slideshow Image 2" />



3 comments:
Laura, I have messed around w/ elements very little here and there for things and I'm impressed with what you know.
I don't do much photo stuff with photoshop, so I have two questions for you...do you usually do similar edits like that on your photos? IAlso, do you do them to the same percentages or levels?
If so, that might be enough to get me to upgrade to regular photoshop because I think you can daisychain some effects together and automate them.
Thanks
Marisa, I use this technique a lot when I'm working with natural light pictures. The percentages are not always the same, but similar. If you upgrade to CS3, you can record your actions and then just push play to run the action on your picture. You can also make adjustable actions. That way, you can adjust each layer if you need to before you flatten them. The upgraded version of photoshop gives you a lot more options!
Thanks for posting these Laura! I think it's great for people to see how much time you spend perfecting their pictures. You're so good with post processing.
Post a Comment